I’ve explained in the online blueprint that you need a “home base” for your online presence.
In fact, your home base might be your navy wife blog, your personal Facebook profile or a fan page, your YouTube channel, or some other social media account or asset.
By the way, you don’t have to be a navy wife to benefit from these step-by-step instructions so keep reading…They will work for a army wife blog or a marine wife blog. You might not even be associated with the military…
The blog is easy (relatively) to start, easy to update, can include photos, videos, text and audio.
Your blog can be the one asset that you have complete control over. Facebook can shut down your account at will and so can YouTube. For absolute control and a range of options, a blog is the best way to go.
Your navy wife blog is going to be your online representation of yourself. So you want to make it your best effort. Let your personality shine through.
I think of it like a beautifully decorated cake. Each one is customized based on the artist and the customer in terms of appearance and content.

Your blog is where your ideal group of buyers will get to know, like and trust you. They will spend hours with you (through your content) here.
Make it worthwhile and they will return again and again to see what’s new.
But first we have to get it set up. And you have one choice to make first.
Navy Wife Blog: Beginner or Pro
What I did: I started online in April 2013 with no online marketing experience. I had no idea what a blog was.
But I wanted to know how to get customers for my home-based business without all of the wear and tear and rejection.
I wanted be able to sell enough stuff on my own so that I never HAD to sponsor a soul.
I wanted to know how to create my own safety net for me and the kids in case of…whatever.
The replicated site for my direct-selling home-based business was not great. And it looked like every other rep’s site.
I wanted my own thing. So that I could explain things the way that I wanted to explain them. And I wanted my potential customers to see what I wanted them to see. First.
I just wanted to see if I could do it, if I liked it and how it would help me get what I wanted.
So I started with the beginner’s blog. It was running in a couple of minutes and I wrote my first blog that night. It was pretty awesome.
I will show you how to set up that beginner’s blog in just few minutes (while the kids are napping)…But first, let’s see if that’s the way you want to go.
Benefits of the Beginner’s Blog
- Super easy to set-up and start getting your message out there
- You don’t have to worry about the technical stuff. With just a few clicks, everything is ready to go.
- Easy to personalize it to reflect your business or target market
- Easy to include video and audio into your posts without jumping through any technical hoops.
- Easy to create blogs targeted to your Empower Blog customers. (Integrated with Empower Network back office and geneaology. If you are not an affiliate of Empower, then this will not apply to you)
- Very inexpensive to start at only $25 per month.
Cons of the Beginner’s Blog
- All of your content is on the Empower Network servers. Any system glitches may affect your site.
- No chance to customize the site 100% (I was actually happy about this in the beginning so that I could focus on creating good content rather than getting sucked into tweaking the appearance of my blog).
- Your site will look a lot or a little like every other Empower Network site – depends on how much customization you do.
- Recurring monthly charge for the blog.
After I got comfortable with blogging, I knew that I wanted something more “me” I decide to start my own self-hosted pro blog – my official navy wife blog – EmpoweredSpouse.com. It definitely has its benefits…
Benefits of the Pro Blog
- Get an asset that you own completely (that no one can ever take away).
- Easy to set-up with the right hand-holding (you get that here) and start getting your message out there in a way that is totally “You”
- Focus on the most important technical things (I will point those out). With just a few clicks, everything is ready to go.
- Easy to personalize it to reflect your business or target market – your 100% unique branding and personality.
- Promote whatever you want.
- Easy to include video and audio into your posts without just a couple of clicks.
- Once you purchase it, you don’t have to pay a monthly fee for the blog.
Cons of the Pro Blog
- A bit more expensive to start in the beginning. It might run you a few months subscription to the beginner’s navy wife blog.
- Takes a couple of hours to get it ready for public consumption. But once it is ready, you have something that you’re completely proud of.
Here I’m rocking a pro-style WordPress blog with the Thesis Theme. You can check it out here. (This is my affiliate link. It doesn’t cost you any extra to buy through me and it will get you the over the shoulder video bonus that shows you how to install it on the cool domain that you purchased, customize it and make it your own personal work of art).
No matter which blog you decide to set up, you are still going to need to master getting lots of people to see it.
There are some things that I will teach you here on this blog and but think of online marketing as a buffet. I focus on just a couple of things like blogging, Facebook and YouTube videos. But there are many more options.
The rest of the Empower Network Products cover the whole buffet. World-class online marketing educational programs from beginners to pros.
So decide which way you want to go with your blog and let’s get it poppin’.
Pro blog instructions are next or click here to get started with the beginner’s blog.
Step 1: Set Up Branded Email
After you have purchased your domain and hosting from Hostgator like I showed you, Hostgator sent you an email and I told you to keep it safe. We’re gonna’ need it now…
Open that welcome email now.
Watch this short video and follow along or follow the step-by-step instructions down below.
We’re going to set up the email for your domain first and then we will install WordPress on your domain.
The email looks like this:

Find the URL for the cPanel login (control panel), click on it or copy and paste it into your browser window. It will take you to a screen like this.
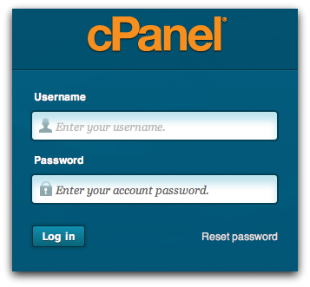
Login using the username and password that you set up when you installed WordPress.
This page is a bit cluttered (that is a bit of an understatement) but this is probably one of the only time you will need to visit it.
At the top, you can find access billing, customer support, password changing and email accounts. You also have a URL for that on the welcome email.
Set up a branded email for your new blog by clicking on “Email Accounts” and fill out the form.
![]() You can use “admin, support, genius, or whatever”@yourdomain.com.
You can use “admin, support, genius, or whatever”@yourdomain.com.
 Once your email account is created, hover over “More” with your cursor and click “Access Webmail.”
This URL is different from the cPanel so bookmark this one so you can easily login to check your mail later.
You can also get instructions on how to set up you email with a client (like Mac Mail or Windows Outlook) or forward it to an existing address.
Boom!
Now you have your own branded email account.
Step 2: Your Own Self-Hosted Blog on Your Own Branded Domain
Time to install the blog. Watch this video and follow along.
Navigate back to the Home page of the cPanel. Scroll down to “Software/Services” and click on “QuickInstall”.
![]()
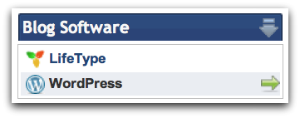
On the left side, under “Blog Software,” find “WordPress.” Click it. Then hit “Continue.”
 Fill out the fields like I show here:
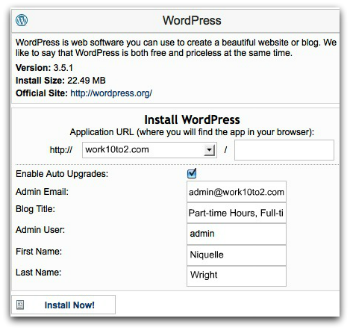
Fill in your domain in the top left box and leave the top right box empty. List your new blog email address and select a blog title. You can change this later so don’t worry about committing.
Click on “Install Now!” and then on the next screen, hit “Finish Installation.”
You will see the progress bar and when it hits 100%, you have your very own self-hosted military wife blog. You have an online presence!
If your ready to keep moving with your pro blog, then lets make it purty…
Step 3: Optimize WordPress and Install Plugins
Find your new WordPress navy wife blog at www.yourdomain.com/wp-admin.
Bookmark it! So you can find it easily later.
Login using the username and password that you created in Step 2.
I am going to show you a few of my favorite plug-ins and how to get those installed.
Believe it or not, that process took me an entire weekend the first time I did it. I didn’t have step by step instructions and I was almost ready to throw my beloved Mac out the window. But I just saved you from that pain…
The only thing that saved me was that I knew that I loved blogging because I had been doing it for months on my Empower Network blog which took me about 2 minutes to start.
And I knew that I really wanted to create a online presences that would be a safety net for me and my family. I wanted an almost hands-free system that would explain and demonstrate for me and allow me to sell enough of my products (without coffee meetings, hotel meetings, chasing friends and family, reject, worry about building a huge team, or any of the typical home-based business junk).
Step 4: Setting Up Your Email Management System
Last step to this well-oiled machine is an email management system. It is also called an auto-responder.
This will allow your system to run on auto-pilot. You will create content that ranks well based on your targeted keywords. This will attract your target audience. They will read your content and sign up to get updates, information and freebies on your capture page and this traffic will become leads. The autoresponder will follow-up automatically with emails that you have created and scheduled.
I have only used Aweber and it is a very popular choice. I haven’t found a reason to switch and their customer support peeps were very patient with me when I first started.
You can get a $1 trial for 30 days if you would like to use my link here.
Once you set up your $1 trial, watch these tutorials where I show you how to set up your Aweber account and add high-converting opt-in forms and squeeze pages to your new navy wife blog.
Well, that’s it.
As promised, you now have your very own navy wife blog.
In fact, if you have been following along with the entire blueprint, you know who you are targeting, you have your blog set-up and you have your email system set-up.
You now have a navy or air force wife blog that you can fill to the brim with cool and valuable content that is all yours.
I will show you how to find pockets of untapped peeps, get ranked in Google, capture free leads, capture Facebook leads and more.
Click around and get started. You can start by scrolling up to the top and clicking on the BluePrint Tab or you can enter your email address here to get more information sent directly to your email.
Your Military Spouse Blog Coach,
Niquelle Wright
Check out some of these other tutorials to spruce up your military wife blog: (COMING SOON)
How to add a Gravatar to your blog
How to add an Instagram widget to your blog
How to make your blog pics sizzle